u-BLOX NINA W106 BEING PROGRAMMED IN BASIC ANNEX RDS - SENDING TEMPERATURE TO THE SERVER u-BLOX THINGSTREAM.IO WITH BRIGDE TO TagoIO VIA DATAFLOW MANAGER

The purpose of this BLOG is to demonstrate how it is possible to program the u-BLOX NINA W106 (ESP32) module in the EVK-NINA-W1 starter kit with the BASIC ANNEX WiFi RDS language (1.43 Beta) and transmit the collected data (temperature - Random) to an MQTT server from u-BLOX ( mqtt.thingstream.io) via WIFI, over port 1883 (not SSL). The data is processed by a powerful tool from u-BLOX called DATAFLOW MANAGER and forwarded to TagoIO for viewing (DASHBOARD). In the example, a TEMPERATURE (Random) is sent every 15 seconds.

u-BLOX NINA W106
Wi-Fi 802.11b / g / n
Dual-Mode Bluetooth v4.2
Powerful open CPU support for custom applications
Small size and multiple antenna options
Pin compatible with other NINA modules
Global certification
ESP32-based module, with 4MB FLASH
SMARTCORE
SmartCore provides modules for wireless communication, biometrics, connectivity, tracking and automation.
Our portfolio includes 2G / 3G / 4G / NB-IoT / Cat.M modem, satellite, WiFi modules, Bluetooth, GNSS / GPS, Sigfox, LoRa, card reader, QR code reader, printing mechanism, mini-board PC, antenna, pigtail, LCD, battery, GPS repeater and sensors.
More details at www.smartcore.com.br
ABOUT BASIC LANGUAGE
BASIC (acronym for Beginner's All-purpose Symbolic Instruction Code; in Portuguese: Code of Symbolic Instructions for General Use for Beginners) is a programming language, created for didactic purposes, by professors John George Kemeny, Thomas Eugene Kurtz and Mary Kenneth Keller in 1964 at Dartmouth College.
Basic can be a language option for learning logic, since it was developed at a high level (close to human language). In addition to its relative ease of creating applications simply and quickly.
BASIC is also the generic name given to a large family of programming languages derived from the original BASIC. There are probably more variations of BASIC than any other programming language.
BASIC ANNEX RDS

ESP-NOW, BLE, MQTT ... GREAT FOR IoT
See the BASIC ANNEX RDS HELP
See also FAQ
MQTT
For Internet of Things (IoT) devices, an Internet connection is a requirement. The Internet connection allows the devices to work with each other and with backend services. The underlying network protocol for the Internet is TCP / IP. Developed on the basis of the TCP / IP stack, MQTT (Message Queue Telemetry Transport) has become the standard for IoT communications.
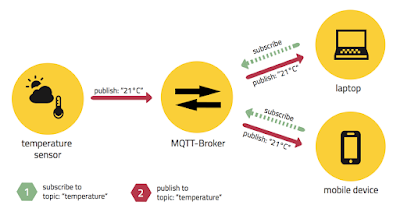
It is an extremely simple and lightweight publishing / signing messaging protocol, designed for restricted devices and low-bandwidth, high-latency or unreliable networks. The design principles are to minimize network bandwidth and device resource requirements, while trying to ensure reliability and some degree of delivery guarantee. These principles also end up making the ideal protocol for the emerging "machine to machine" (M2M) or "Internet of Things" world of connected devices, and for mobile applications where bandwidth and battery are at a premium.
The annex implements the protocol with the following limitations:
- It can only post QoS 0 messages.
- You can enroll in QoS 0 or QoS 1.
- The maximum message size is 256 characters
- The maintenance interval is set to 15 seconds
- The client uses MQTT 3.1.1
Thingstream (DATAFLOW MANAGER)

It also implements SSL and SN-MQTT
Thingstream environment
Features:
- the cost of Thingstream as an MQTT Broker is much less than the cost of those associated with Azure and AWS;
- the data flow manager is an excellent advantage, data can be handled on the server and then forwarded;
- allows Node.js programming;
- security is different and much simpler than trying to exchange certificates with AWS etc;
- has a secure connection instead of the device. This really simplifies integration;
- ability to subscribe to several different topics;
- nodes for access to various AWS services Amazon, Azure IoT, IBM Watson, IFTTT (DashBoard and a multitude of other options)
- creation of Things (Thing);
- monitoring of MQTT events;
- menus for configuration.


TagoIO

TagoIO is a startup located in the United States that develops a platform for collecting data from connected devices.
The TagoIO platform is not 100% free or open-source, but it does have a free plan with limitations. In this plan, it is possible to create up to 5 devices, 25 thousand records in the database, 100 thousand requisitions per month and also the creation of up to 5 dashboards (data visualization panels), among other functions.
Compared to other free platform options, TagoIO's great advantage is that in a larger project, the free plan can be converted into a paid plan, increasing the platform's capabilities and the project's possibilities.
In general, for maker projects, TagoIO is an excellent option, with many interesting features.
INTERPRETATOR?
The basic interpreter works by reading a script file saved in the archiving system on a local esp disk.
This is the default mode if no external SDcard is connected to the u-BLOX NINA W106.
In addition, Annex32 can use an external SDcard as a file system, allowing up to 16 Gbytes of disk space.
During startup, if an external SDcard is detected, it will be automatically connected and used as the default file system, in which case the internal file system will not be used.
As the u-BLOX NINA W106 contains a good amount of RAM, the user script is copied from the disk to a dedicated area in the RAM memory where it is executed, along with the list of the program lines, the branch labels and the list of the user defined subroutines ..
This uses more RAM compared to other approaches, but allows for faster program execution.
Another performance consideration is that the u-BLOX NINA W106 must be able to perform various activities in the background (web server, file server, etc.), therefore, it needs sufficient free memory to perform such tasks, and these parallel tasks will obviously have an impact on the performance of the script.
Therefore, in terms of performance, the interpreter is not particularly fast, but it must be fast enough for most tasks that you may require.
BASIC Annex RDS MQTT Commands / Events
Sign: Subscribe Publish: Publish
Getting MAC ADDRESS
Print MAC $
Example
The example below:
- Sets the server and (non-SSL) port for the ThingsStream.io Server
- Transfer credentials
- Publish a RANDOM number to the topic every 15 seconds
- Subscribes to the same topic, shows the return when published something in it
' MQTT test program
' Using mosquitto test server
print mqtt.setup("mqtt://mqtt.thingstream.io:1883",0)
print mqtt.connect("xxxxxxxWCKHZASRDIOME9", "xxxxxxtke4yXeF1lY9mXbbCxToxxxxgE3CViJ/4", "device:xxxxxxx-3211-4e46-8a9a-xxxxx2e4ca86")
print mqtt.subscribe("esp32-sniffer/a4cf127531c8/ble") ' subscribe to the topic /AnnexTest
onmqtt mqtt_msg
while 1
' send messagages to MQTT ThingStream.io
js$ = "{""variable"":""temperature"",""value"":" + str$(RND(100)) + "}"
print mqtt.publish("esp32-sniffer/xxxxxxf127531c8/ble", js$)
pause 15000
Wend
print ramfree
wait
' receive messages from the server
mqtt_msg:
print "TOPIC : "; mqtt.topic$
print "MESSAGE: "; mqtt.message$
return
Execution
Credentials must be obtained from ThingStream.IO

Get the credentials here
The MQTT Topic must be created here

Traffic at u-BLOX MQTT Broker


MQTT ThingStream server receiving u-BLOX NINA W106 Topic (RANDOM) data
(are in HEXADECIMAL)
DATAFLOW MANAGER
In the example, DATAFLOW MANAGER is subscribed to the Topic which u-BLOX NINA W106 publishes data on.
print mqtt.subscribe ( "esp32-sniffer / a4cf127531c8 / ble" ) 'subscribe to the topic
Once the data is published, DATAFLOW MANAGER forwards it to the debug for viewing.
Basically DATAFLOW MANAGER subscribes to the same topic, transforms the received data to String and
shows it in the DATAFLOW MANAGER debug .
shows it in the DATAFLOW MANAGER debug .

About the thingsteam subcribe in DATAFLOW MANAGER , it is the field that did subscribe to receive the data sent by u-BLOX NINA W106 ( publish)
Configuring TagoIO
Basically the generated code authenticates itself on a local network and then makes an HTTP connection on the TagoIO server.
The POST below is considered one of the most important points in the entire DATAFLOW MANAGER configuration.
Basically it makes an HTTP request to the TagoIO server and passes the header. In this header there is a Token (apiKey) which must be obtained from the TagoIO server and which is associated with a "variable" field, in the case " temperature " In the example, for tests, a Temperature (RANDOM) is generated in the u-BLOX NINA W106
The POST below is considered one of the most important points in the entire DATAFLOW MANAGER configuration.
POST / data HTTP / 1.1 Host: api.tago.io
Device-Token: xxxxxxxx-xxxx-xxxx-xxxx-xxxxxxxxxxxx
_ssl: false Content-Type: application/json
Content-Length: 54
{"variable": "temperature", "value": 24}
Basically it makes an HTTP request to the TagoIO server and passes the header. In this header there is a Token (apiKey) which must be obtained from the TagoIO server and which is associated with a "variable" field, in the case " temperature " In the example, for tests, a Temperature (RANDOM) is generated in the u-BLOX NINA W106
There are some details to be observed, where the Token and API address should be, information obtained from the TAGO.IO website, with the creation of a DEVICE and the creation of a VARIABLE which should be referenced via JSON when the device is used. blox NINA W106 send the data. {"variable": " temperature ", "value": 24}
Every 15 seconds the application (DEVICE) connects to TagoIO, with its ACCESS KEY and JSON to place the content in BUCKET. A DASHBOARD was created to store the history of the data sent for a period.
Creating TagoIO account

To start, let's create an account at TagoIO, and register our first device there. To do this, after registering, login and click on "Device" and then on the plus sign (+) in the upper right corner to add a new device. Fill in the information and save.
After the device is added, access the device again in the "Devices" menu and select the "Tokens" tab. This token will be used for ESP to send the data to him, in the correct “bucket” (database).
Copy the token / apiKey in the code below, compile and save it to NINA W.
Create an account as a Developer!
Create DashBoard
Dashboard

Great LINK for access to TagoIO
Some Print Screens of the configuration for this BLOG

Creating access via HTTP

Creating Buckets and Devices


Dashboard
Configuring DATAFLOW MANAGER

JSON - Payload

{"variable": "temperature", "value": 24}

HTTP headers

msg.headers = {};
msg.headers ["Content-Type"] = "application / x-www-form-urlencoded";
msg.headers ["Device-Token"] = " xxxxxxxx-xxxx-xxxx-xxxx-xxxxxxxxxxxx ";
msg.url = "https://api.tago.io/data";
return msg;

HTTP call


Result


VIDEO (execution of the Complete System)
no audio
DOUBTS
support@smartcore.com.br
REFERENCES
About SMARTCORE
Nenhum comentário:
Postar um comentário